I love to add sprouts to my salad or sandwich. I try to keep a supply on hand, but I don’t have the best lighting or space to grow them in my house. Now that I’m putting this article about them on my site, I will try to grow them again this Winter. Growing microgreens and sprouts provides access to fresh, nutritious food in an emergency. These small, fast-growing plants need little space, time, or equipment. They are ideal when resources are limited or outdoor gardening isn’t possible.
Microgreens and sprouts can be grown indoors year-round, even in a small apartment. Maybe I’ll try an Aerogarden again. I want to grow microgreens this time. They provide fresh vitamins, minerals, and antioxidants to complement stored survival foods. Here’s how to grow your own microgreens and sprouts at home. They provide fresh food in emergencies.
Understanding the Difference Between Microgreens and Sprouts
Microgreens and sprouts are similar in that both are harvested early in the plant’s life cycle but differ in growth methods, flavor, and nutrient content. Sprouts are simply germinated seeds, including the seed, root, and shoot, eaten within a few days of soaking and rinsing.
Read This: Microgreen
Sprouts are soft, with a mild flavor, and can be grown quickly—usually within 3 to 5 days. Microgreens, on the other hand, are grown in soil or a growing medium and are harvested a bit later after they develop small leaves, typically within 7 to 14 days. Microgreens have more intense flavors and a higher concentration of nutrients than sprouts.
Why Microgreens and Sprouts Are Ideal for Emergency Preparedness
Growing microgreens and sprouts provide essential nutrients, including vitamins A, C, and E, as well as minerals like potassium, calcium, and magnesium. They also contain fiber and antioxidants, adding fresh greens to your diet without needing outdoor space or soil.
These crops require minimal light, water, and time, making them practical when traditional gardening methods are unavailable. With proper rotation and regular harvesting, you can maintain a continuous supply of fresh food with just a few supplies.
Read and Learn: How to Use an Aerogarden for Herbs
Getting Started with Sprouts
Sprouts are among the simplest foods to grow in an emergency, as they only require seeds, water, and a jar or sprouting tray.
- Choosing Seeds: Start with high-quality, sprout-safe seeds from reputable sources. Popular choices include alfalfa, broccoli, radish, mung beans, and lentils. Always use seeds specifically labeled for sprouting, as they’re tested to be safe and free from contaminants.
- Preparing the Sprouting Jar: Rinse the seeds thoroughly to remove debris, then place them in a wide-mouth glass jar. A mason jar works well. Cover the seeds with water and let them soak for several hours or overnight, depending on the seed type.
- Rinsing and Draining: After soaking, drain the water and cover the jar with a mesh lid or a piece of cheesecloth secured with a rubber band. Rinse the seeds with fresh water, then drain thoroughly to remove all moisture. Place the jar upside-down at an angle to allow excess water to drain out completely. This step prevents mold and bacterial growth, which can occur in moist environments.
- Daily Rinsing: Rinse and drain the seeds twice daily to keep them moist but not waterlogged. After 3 to 5 days, the seeds should sprout and be ready to eat. The sprouts will have small green shoots and may even develop tiny leaves.
- Harvesting and Storing Sprouts: Once they reach your preferred length, transfer them to a clean container and store them in the refrigerator, where they’ll keep fresh for up to a week.

Growing Microgreens for a Steady Supply of Greens
Microgreens require slightly more setup than sprouts but offer more flavor, texture, and nutrient content variety.
- Gathering Supplies: To grow microgreens, you’ll need a shallow tray, growing medium (like potting soil or coconut coir), and high-quality seeds. Microgreen trays are typically about 1 to 2 inches deep. You can repurpose shallow containers or purchase special microgreen trays with drainage holes.
- Preparing the Growing Medium: Fill the tray with about an inch of growing medium. If you’re using soil, moisten it lightly, but don’t saturate it, as excess moisture can lead to mold. Level the surface to ensure even coverage for your seeds.
- Sowing Seeds: Scatter the seeds evenly across the soil’s surface, aiming for a dense layer but without overlapping too much. Lightly press the seeds into the soil for better contact, but only cover them partially, as many microgreen seeds need light to germinate.
- Watering and Covering: Mist the seeds with a spray bottle to moisten the surface. Cover the tray with a lid or another tray to block light for the first 2-3 days, encouraging germination. Keep the tray in a warm place with indirect light.
- Uncovering and Growing: After 2-3 days, when you see small sprouts, remove the cover and place the tray in a spot with indirect sunlight or under a grow light. Continue misting daily to keep the soil moist, but avoid overwatering, as soggy conditions can lead to mold growth.
- Harvesting Microgreens: Microgreens are ready to harvest once they’ve grown their first true leaves, usually within 7-14 days. Use clean scissors to cut the greens just above the soil line. Rinse the harvested microgreens and use them immediately, or store them in the refrigerator for a few days.
Read this: Beginner Guides: Basics
Essential Tips for Growing Microgreens and Sprouts Successfully
- Choose the Right Seeds: Use seeds specifically intended for sprouting and microgreens. Regular garden seeds may contain pesticides or other treatments not meant for consumption at the sprout or microgreen stage.
- Practice Cleanliness: Sprouts are prone to bacterial growth if not properly rinsed, and microgreens can mold if overwatered. Always rinse seeds thoroughly, use clean containers, and ensure proper drainage to reduce the risk of contamination.
- Rotate Crops for Continuous Harvest: Start a new batch every few days to maintain a steady supply. This rotation will give you a continuous cycle of fresh sprouts or microgreens, allowing you to enjoy fresh greens daily.
- Monitor for Mold and Pests: Look for signs of mold, especially in humid conditions. Good airflow and proper drainage help prevent mold. If you notice mold, remove affected sections immediately to prevent it from spreading.
- Light Requirements: Sprouts don’t need much light, while microgreens require indirect sunlight or a grow light to develop strong leaves. If you’re growing indoors with limited natural light, consider investing in a simple LED grow light.
Nutritional Benefits of Microgreens and Sprouts
Both microgreens and sprouts are nutritional powerhouses. Sprouts, like alfalfa and mung beans, are high in enzymes, vitamins C and K, and protein, making them excellent for supporting energy levels in emergencies.
Microgreens, including broccoli, sunflower, and radish, are concentrated in vitamins A, C, and E and essential minerals. Broccoli microgreens, for instance, contain high levels of sulforaphane, an antioxidant compound shown to support cellular health and immune function. Having a source of fresh, living foods can provide a welcome variety to canned and stored foods, helping maintain physical health during stressful situations.
Storing Seeds for Long-Term Use
Consider storing seeds in bulk if you’re growing microgreens and sprouts as part of your emergency preparedness. Properly stored seeds can remain viable for years. Keep seeds in airtight containers, like vacuum-sealed bags or glass jars with tight-fitting lids, and store them in a cool, dry, dark place.
Consider placing the seeds in the refrigerator or freezer for extended storage, lasting up to five years or more. Rotate your seed stock periodically to ensure you always work with fresh, viable seeds.

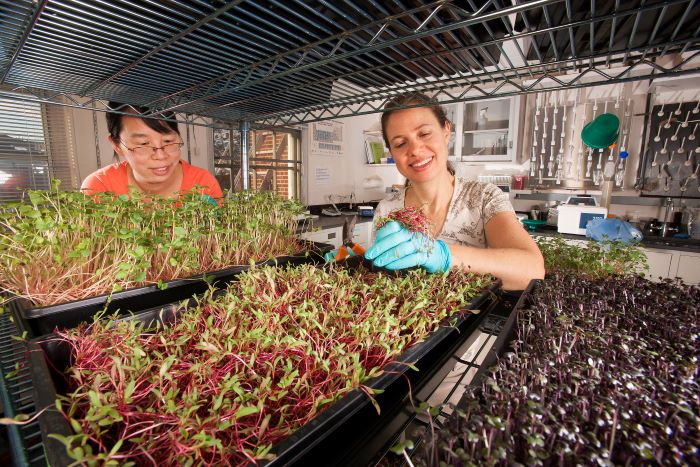
for shelf-life studies and nutrient analyses. By Peggy Greb Public Domain
Using Microgreens and Sprouts in Meals
Microgreens and sprouts are highly versatile. They can be eaten raw or incorporated into various meals. They add a fresh crunch to sandwiches, wraps, and salads and can be blended into smoothies for a nutrient boost.
Sprouts make great toppings for soups and stews, while microgreens work well in stir-fries and as garnishes for main dishes. Fresh greens can improve meal variety, boost morale, and ensure a balanced diet during emergencies.
Growing microgreens and sprouts is a cheap, sustainable way to get fresh food in a crisis. With a few supplies and some care, you can grow fresh greens. They will boost your emergency food supply and support your health.
Have you tried growing microgreens or sprouts? What kind did you grow? I love the broccoli microgreens and the alfalfa sprouts. What did you grow them in? Please reply below to assist others in their growing process.
I’m the daughter of 2 original survivalists who moved from the north to sunny Florida. My mother, along with her parents, bought 30 mostly uncleared acres in 1938. The first home was made of pecky-cypress and built by a house-raising. My mother raised 10,000 chickens.
My divorced mother met and married my father in 1948. From pine trees on our property, he hand-built a log cabin. He also built a tarpaper-lined 65’x45′ pool with duck pond overflow. We had an artesian well for our water and powering our hand-built waterwheel for the pool. He built a substantial cantilevered roof workshop with a car pit in the massive cement floor.
Since my early teens, I have read a ton of books about survival, prepping, the bomb, an apocalypse, homestead living, and SHTF situations. As an adult, I continue to read sci-fi, survival prepping, and science. I practice a prepper lifestyle albeit a bit modified, read a lot, buy a lot, pack/store a lot of anything survival related.
Read my About Me post for more details on our self-sufficient living. I lived there until I went to college in 1968.
My SurvivalPrepperSupply.com blog strives to educate individuals on coping with natural and human-caused disasters using article posts about preparing for emergencies.


